How To Clean Headphone Jack: Quick Safe Cleaning Tips
Clean the jack by powering off, removing debris with a toothpick, and using isopropyl alcohol sparingly.
I’ve cleaned dozens of devices, from old MP3 players to modern phones and laptops, so I know what works and what can go wrong. This guide shows you exactly how to clean headphone jack safely, step by step, with clear tools, real-world tips, and the mistakes to avoid. Read on to learn methods that fix static, poor audio, or wobbly plugs without damaging your device.
Why you should learn how to clean headphone jack
A dirty headphone jack causes crackling, one-sided sound, and loose connections. Dust, lint, and pocket debris build up over time and block the electrical contact points. Learning how to clean headphone jack saves money, extends headphone life, and avoids unnecessary service calls. I’ve fixed many devices in minutes by following a careful cleaning routine.

Tools and materials for how to clean headphone jack
Choose safe, non-conductive tools and low-residue cleaners. Here’s what I use and recommend.
- Toothpick or wooden skewer for gentle scraping
- Cotton swabs (only slightly damp) and lint-free cloth
- 90%+ isopropyl alcohol for quick evaporation and low residue
- Compressed air can or blower to remove loose dust
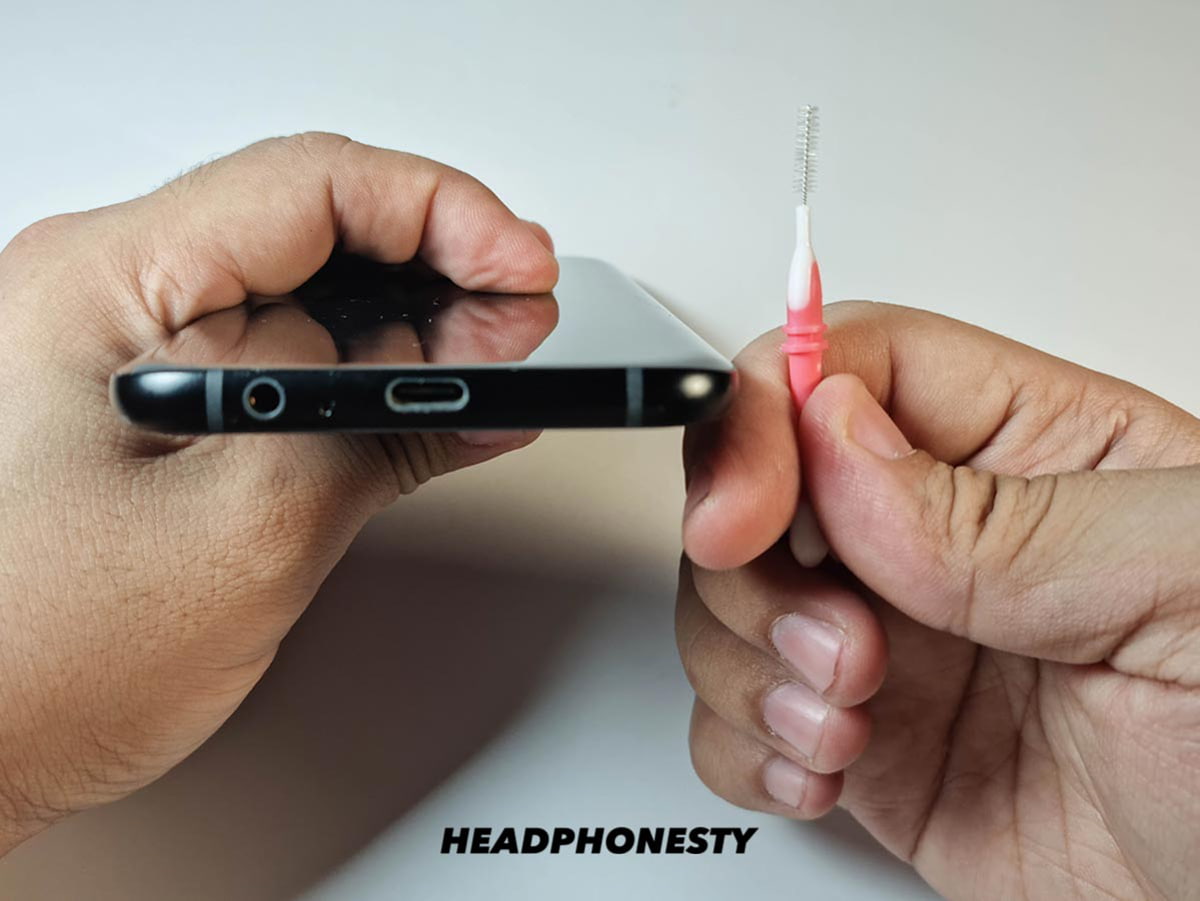
- Soft anti-static brush or interdental brush for fine debris
- Electronic contact cleaner for tough oxidation (optional)
- Rubber or plastic probe to avoid shorting contacts
Always power off the device and remove the battery if possible. Avoid metal items like pins, needles, or paperclips because they can short the contacts and damage the jack when you try to clean. I learned this the hard way when a metal tool caused a short on an old MP3 player; wooden picks work far better.
Step-by-step guide to how to clean headphone jack
Follow these ordered steps for a safe, effective clean.
- Power off and unplug
- Turn off your device and disconnect any cables. Remove the battery if the design allows.
- Inspect the jack
- Use a flashlight to look inside. Note lint, dust, or corrosion. This tells you which method to use.
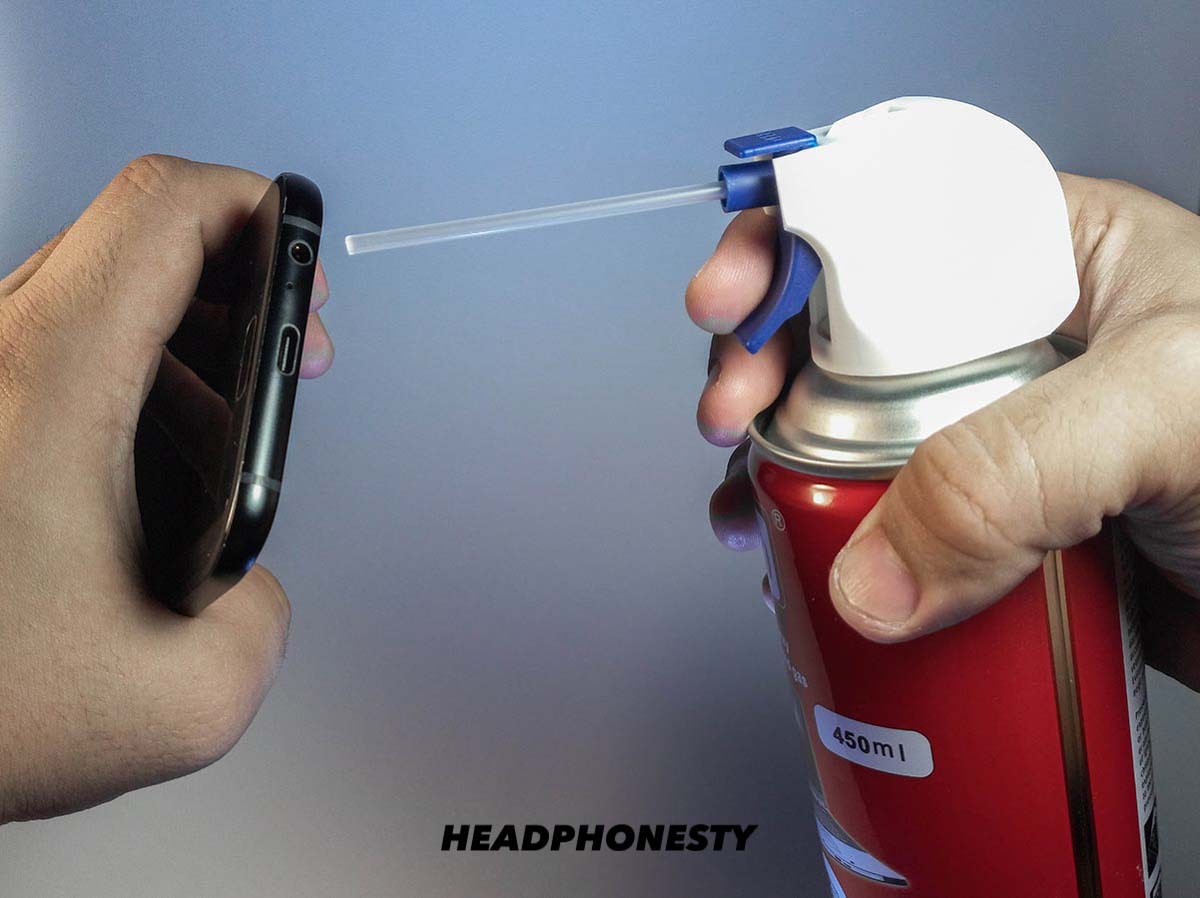
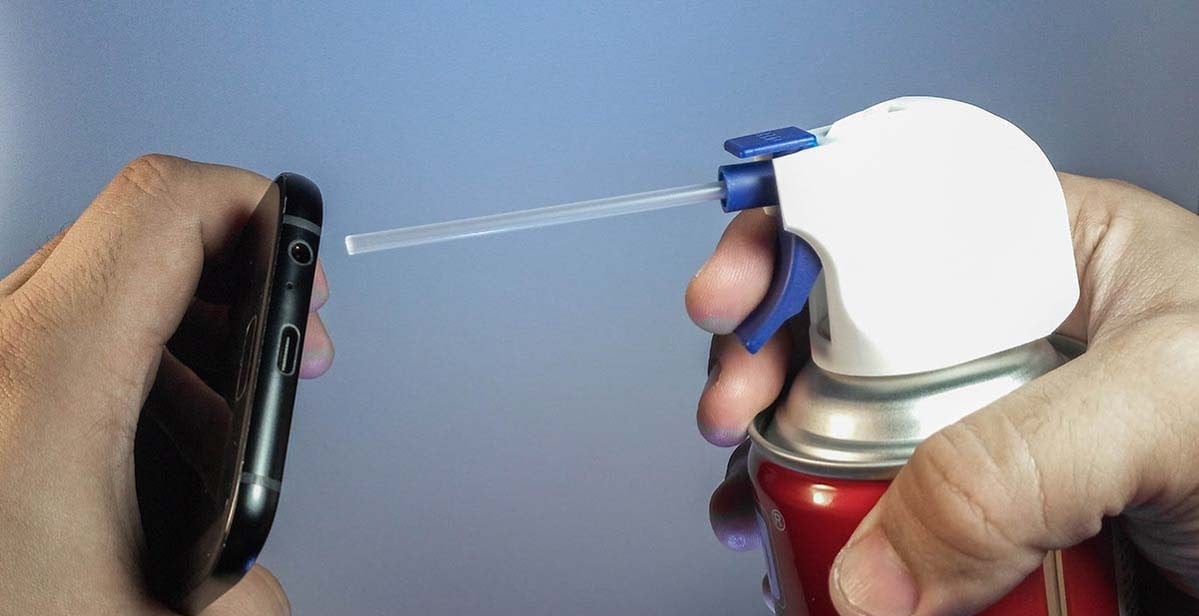
- Blow out loose debris
- Use short bursts of compressed air from a small distance. Don’t spray liquid propellant into the jack.
- Gently remove lint
- Use a wooden toothpick or interdental brush to coax lint out. Work slowly and rotate the tool as you pull debris free.
- Clean contact surfaces
- Lightly dampen a cotton swab with isopropyl alcohol and touch only the entrance and inner rim. Do not shove wet cotton deep inside.
- Dry thoroughly
- Allow the jack to air dry for several minutes. Use a dry cotton swab or a short blast of compressed air to speed drying.
- Test audio
- Power the device back on and test with headphones. Repeat steps if audio issues persist.
I once cleaned a tablet jack with these steps and restored perfect stereo sound. The key was patience; rushing can push debris farther in.

Common mistakes when you try to clean headphone jack
Avoid these pitfalls that cause more harm than good.
- Using metal tools that can short or scratch contacts. I’ve seen bent contacts from paperclips.
- Drenching the jack with liquid. Excess liquid can pool and damage internal circuits.
- Rubbing too hard and bending internal springs. Gentle, repeated attempts work better.
- Using cotton swabs deep inside. Loose fibers can remain and worsen the problem.
- Ignoring manufacturer advice. Some devices specify not to use sprays or liquids.
If the jack is corroded or physically damaged, cleaning may not fix it. Be honest about when the issue requires a repair or replacement.
Preventive care: keep your jack clean longer
Small habits prevent buildup and extend device life.
- Store devices in a pocket-free pouch when not in use. That reduces lint entry.
- Clean pockets and bags regularly to cut down on debris.
- Use a dust plug or small cap for seldom-used jacks.
- Avoid putting devices face-down on dusty surfaces.
- Check the jack every few months and clean gently if you notice audio issues.
In my experience, a quick inspection and gentle air blast every quarter keeps most devices working smoothly.

When to seek professional help for headphone jack issues
Know when cleaning is not enough.
- If the jack is loose or wobbly, internal mounting may be broken and needs repair.
- If there is corrosion or green/white buildup, professional cleaning or part replacement is safer.
- If audio still cuts out after careful cleaning, the internal wiring may be damaged.
- If the device is under warranty, contact the manufacturer to avoid voiding coverage.
I advise seeking a technician instead of forcing deep cleaning on complex devices. Repair centers have the right tools and replacement parts.
Frequently Asked Questions of how to clean headphone jack
How often should I clean headphone jack?
Check it every 3 to 6 months if you carry the device in a pocket or bag. Clean sooner if you notice sound issues or a loose fit.
Can I use water to clean headphone jack?
No. Water can short the device and cause corrosion. Use high-purity isopropyl alcohol sparingly instead.
Will cleaning the jack void my warranty?
It depends on the device and how you clean it. Using approved, gentle methods usually won’t void warranty, but disassembling the device often will.
Is compressed air safe for cleaning headphone jack?
Yes, if used in short bursts and held a few inches away. Avoid continuous blasts and never use canned air upside down.
What if cleaning does not fix the sound problem?
If careful cleaning fails, the jack may be damaged or the internal wiring faulty. Seek professional repair or check warranty options.
Conclusion
Cleaning a headphone jack is a quick fix you can do at home with the right tools and care. Power off, inspect, remove loose debris, and use isopropyl alcohol sparingly to restore sound without harm. Small, regular maintenance prevents most problems and keeps your headphones working longer. Try these steps on your next audio hiccup, and leave a comment to share what worked for you or to ask a question.